



A villa renovation can begin with a quotation that looks complete, but waterproofing repairs, AC changes, approval fees and material substitutions may appear after work starts. By then, part of your budget has already been committed, and changing direction becomes harder.
You may also have explained exactly how you want the villa to feel, from the privacy of the family areas to the colours, lighting and details that make the home feel like yours. That direction must then pass through drawings, approvals, suppliers and several site teams. If each team makes small decisions without one clear reference, the finished villa can slowly move away from what you approved.
Handover brings another concern. Fresh paint and clean floors can make a villa look ready, but poor drainage, uneven joinery, incorrect materials or unresolved AC problems may only appear when someone tests them properly.
A well-managed villa interior design service should protect your budget and carry the same design direction from the first brief to post-snagging. Continue reading to see how to survey the villa, set the scope, control costs, confirm approvals, check materials and close every snag before you accept the finished home.
Step 1 Describe How You Want the Villa to Feel and Work

You may already know that you like modern, minimal, contemporary or classic interiors. These style names give the designer a starting point, but they do not explain how you want to live.
Perhaps you want the entrance to feel formal when guests arrive, while the family areas remain relaxed. You may need quiet rooms for work, more privacy between bedrooms, or easier movement between the kitchen and dining area.
Your brief should also cover comfort. Think about where direct sunlight becomes uncomfortable, which rooms feel dark, and how you use the villa after sunset.
In a 2021 residential-lighting pilot study, Rengin Aslanoğlu and researchers from Bilkent University, Warsaw University of Technology, Wrocław University of Environmental and Life Sciences, and the University of Lincoln surveyed 60 adults across four countries. They found that the amount and uniformity of light had the strongest connection with residents’ lighting satisfaction.
This does not mean that every villa needs larger windows or more light. It means the design team should understand how daylight, glare and artificial lighting affect the way you use each room.
Before discussing finishes, answer a few simple questions:
- How should the villa feel when you enter?
- Which rooms currently make daily life difficult?
- Where does your family spend the most time?
- How often do you receive guests?
- Which areas need more privacy?
- Do any rooms feel too dark, hot or exposed?
- What furniture, artwork or personal objects should remain?
- Which parts of the existing villa still work well?
- Is this a long-term family home, rental property or resale project?
- When do you need the villa ready?
You should also explain your financial range. A clear budget helps the design team suggest suitable materials and avoid developing ideas that cannot move forward.
Ask for these decisions to form a written brief. When choices become difficult later, the team can return to it and check which option still supports the home you originally described.
Step 2 Find the Real Problems Before They Enter the Budget
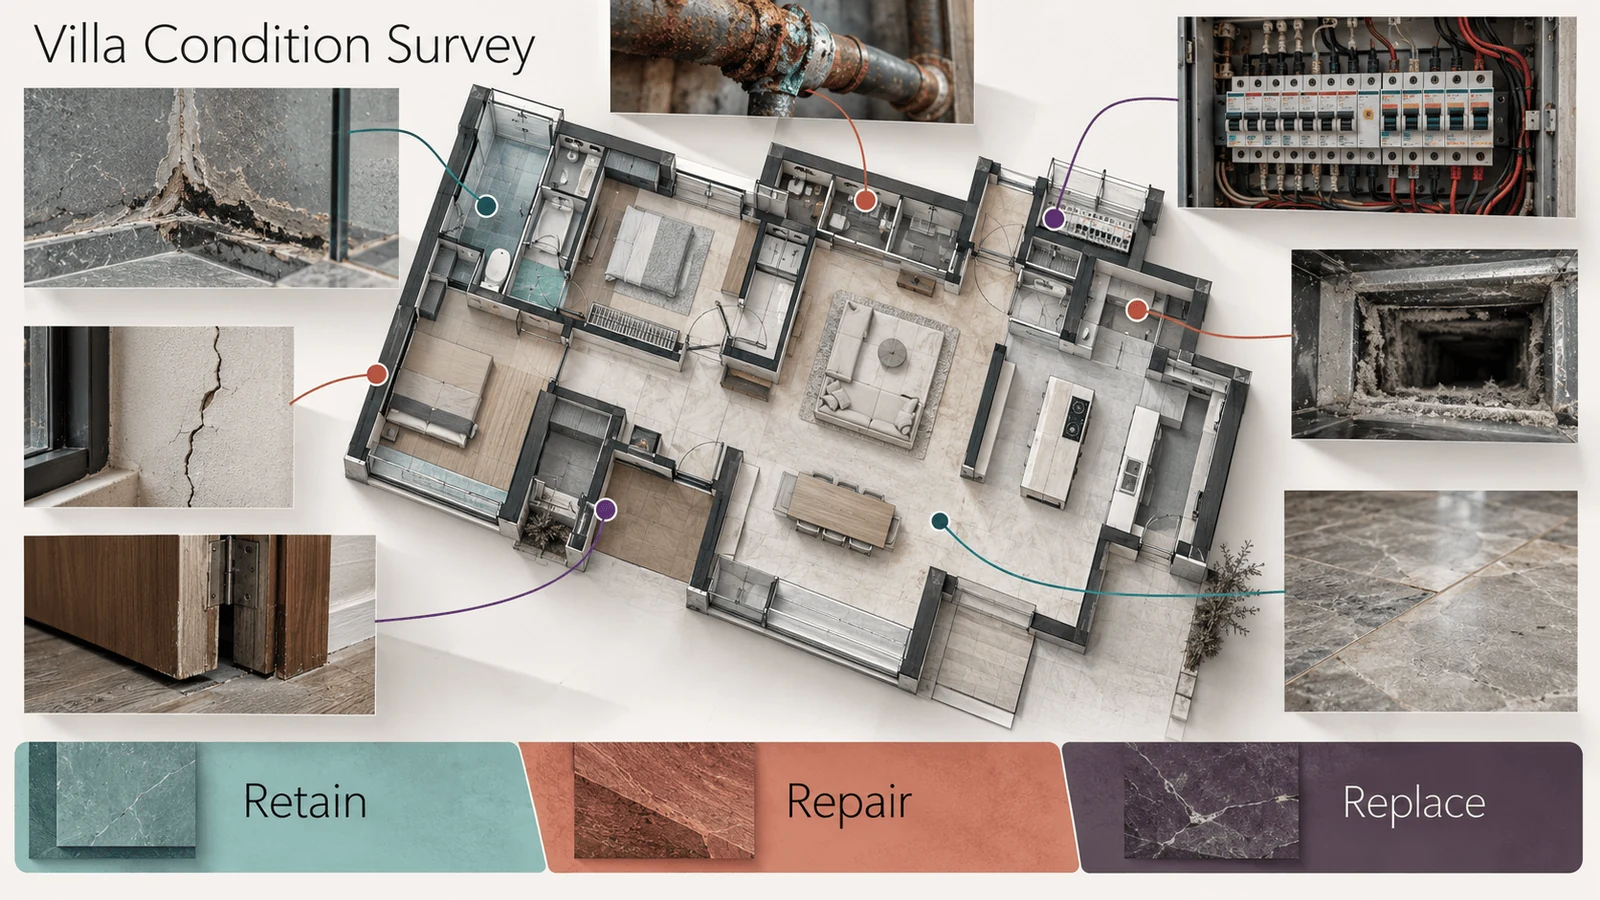
A contractor can discuss a rough estimate after seeing photographs, but an accurate renovation scope needs a physical site survey.
Pictures may show old flooring, dated bathrooms or damaged cabinets. They cannot confirm the condition of concealed plumbing, waterproofing, electrical distribution or air-conditioning systems.
The survey should check:
- The existing structure
- Actual room dimensions
- Walls, floors and ceilings
- Plumbing and drainage
- Electrical panels, wiring and sockets
- Air-conditioning systems and ductwork
- Waterproofing in wet areas
- Roofs and external walls where relevant
- Previous alterations
- Kitchen and bathroom services
- Existing furniture, materials and fixtures
MEP means mechanical, electrical and plumbing work. These systems often sit behind ceilings, walls and floors, so problems can become expensive when the team discovers them after finishing work has started.
The inspection should divide the findings into three groups.
Retain
These elements still work, support the new design or hold personal value. Keeping them can protect the budget and reduce unnecessary waste.
Repair
These items can continue after maintenance, correction or refinishing.
Replace
These parts have failed, create a safety or functional problem, or cannot support the planned layout.
Ask the team to create a photographic condition record before site work begins. It should show existing cracks, damaged finishes, leaks, misaligned doors and other visible problems.
This record gives everyone the same starting point. It also helps separate old defects from damage that may happen during construction.
While checking the property, check the company as well. Review its completed interior projects and look for work that matches the size and complexity of your villa.
Ask who handled the design, technical drawings, procurement, site coordination and snagging on those projects. A portfolio becomes more useful when you understand the actual scope behind the photographs.
The final quotation should follow the survey findings. If a major cost appears in the proposal but has no connection to the inspection, ask why the work is necessary.
Step 3 Lock the Design Before It Passes Through Different Hands
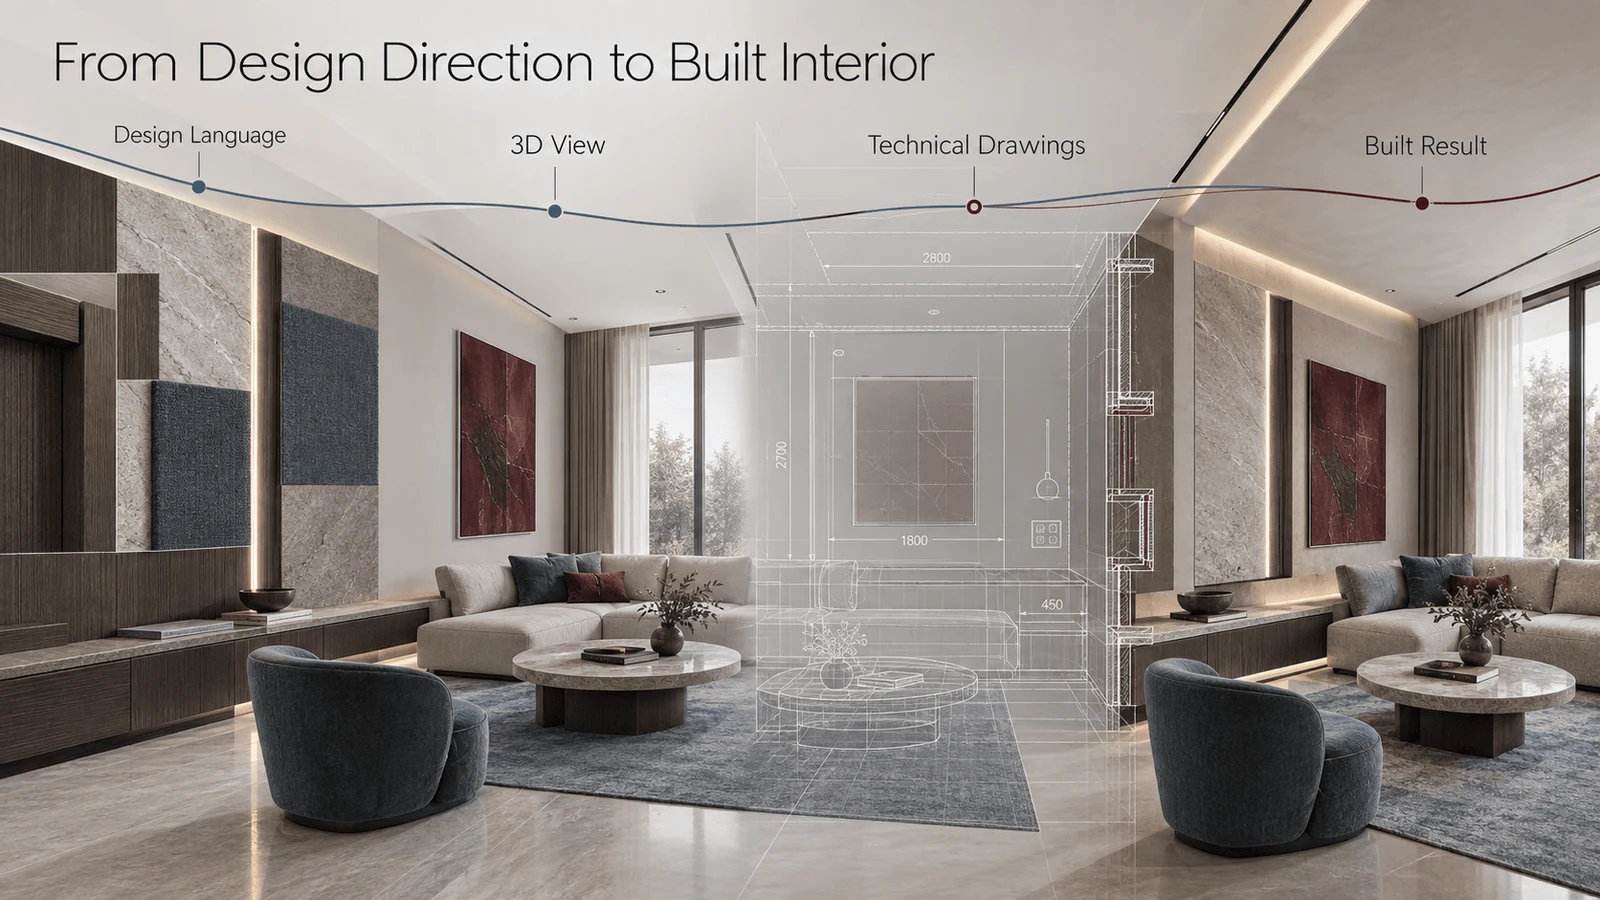
During a renovation, your original idea passes through designers, technical consultants, suppliers, contractors and specialist trades, where each person works on one part, so the project needs a clear design language that keeps those parts connected.
Design language includes choices such as:
- Main colour family
- Wood tones
- Stone and flooring
- Metal finishes
- Lighting character
- Joinery details
- Furniture shapes
- Fabrics and soft finishes
- Important personal pieces
These choices do not need to look identical in every room. They need enough connection for the villa to feel like one home.
A complete design package may include:
- Space plans
- Concept boards
- 3D visualisations
- Material selections
- Lighting and electrical plans
- Ceiling and flooring plans
- Kitchen and bathroom details
- Joinery drawings
- Plumbing and AC coordination
- Construction drawings
The 3D views show the intended appearance, while the technical drawings explain how the team will build it. A room may look complete in a visual even though the site team still needs dimensions, wiring points, material codes and installation details.
A Practical Lesson From The Next Chapter
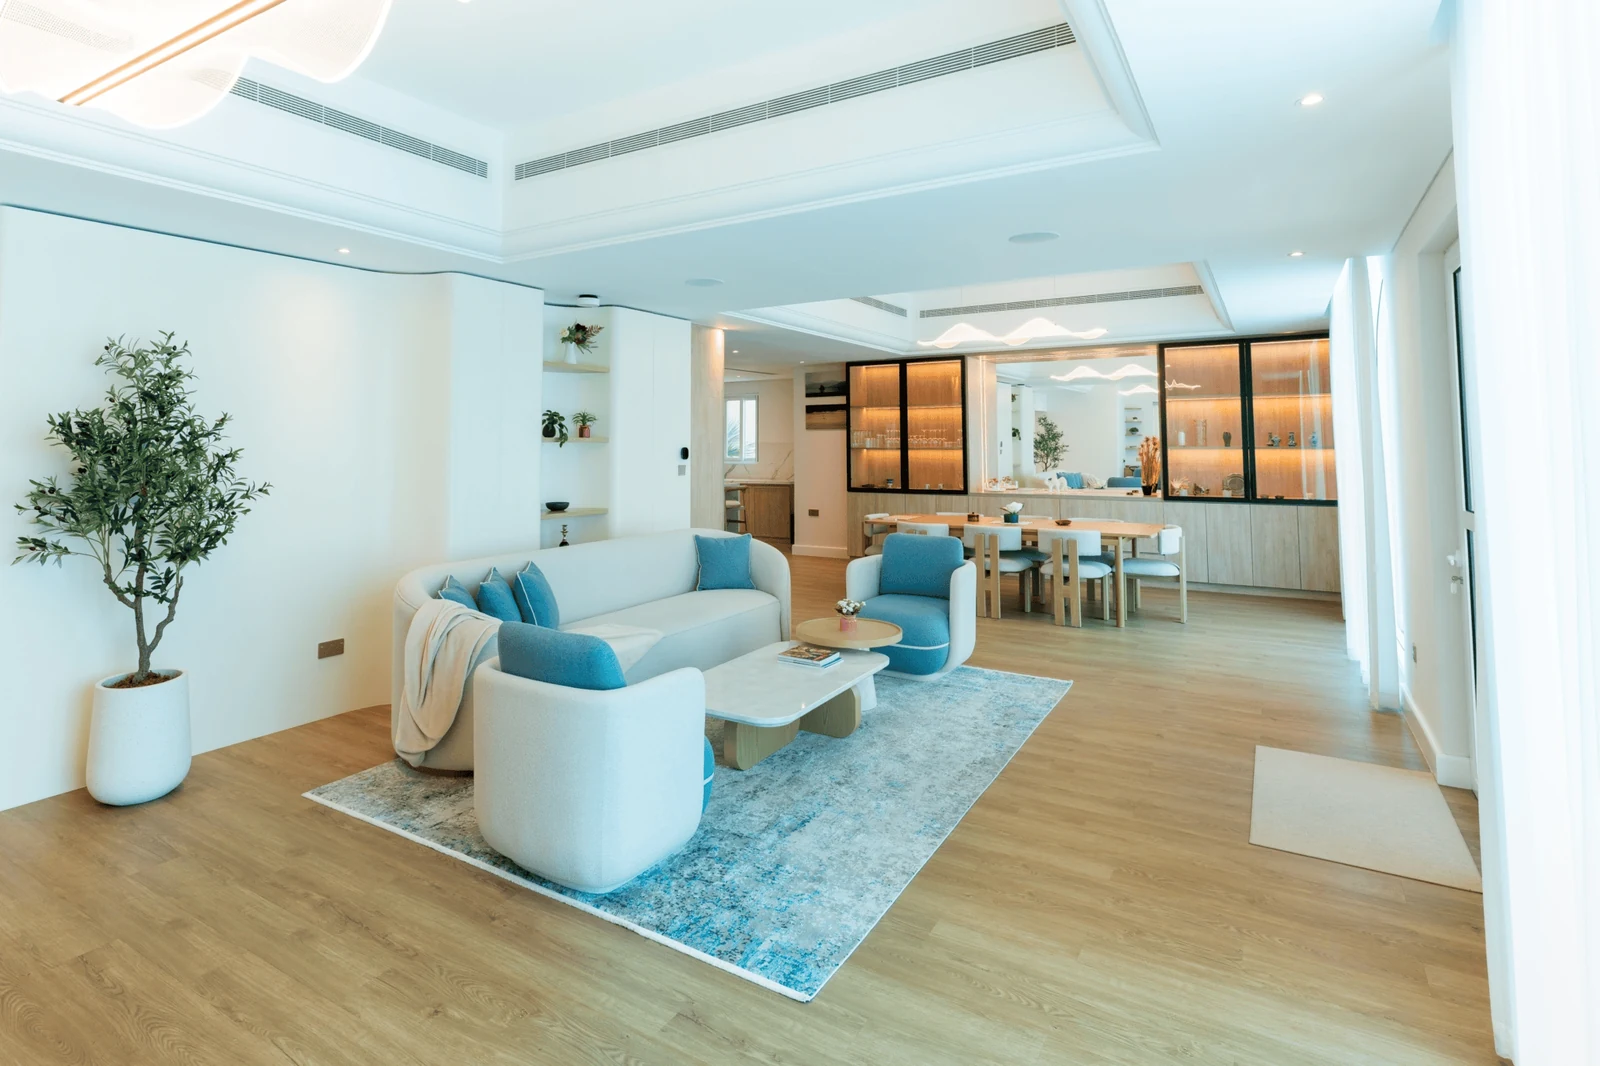
The Next Chapter villa covers 5,800 sq ft in Dubai Sports City and took 20 weeks to complete.
The team retained the existing structure, so the project did not depend on demolition or major civil work. The scope focused on concept development, spatial planning, joinery details, materials, lighting, sourcing and styling.
One useful lesson from this project was that retaining the shell did not turn the work into a simple decorating job. Lighting, storage, finishes and room flow still needed to work together, or the existing structure and new interior could have felt disconnected.
The main palette was also settled early, so once the pale finishes, warm oak and lighting direction became clear, the team could develop each room against the same visual reference.
Ask your designer to prepare a short design continuity sheet containing:
- How the villa should feel
- Main colour family
- Approved wood tone
- Approved stone or flooring
- Metal finish
- Lighting direction
- Joinery style
- Existing pieces that must remain
- Details that should continue between rooms
- Materials or styles you do not want
Keep this sheet with the approved drawings and samples. If a product becomes unavailable, the team can use it to judge the proposed replacement instead of choosing the nearest available colour.
Step 4 Know Where Every Dirham Is Going
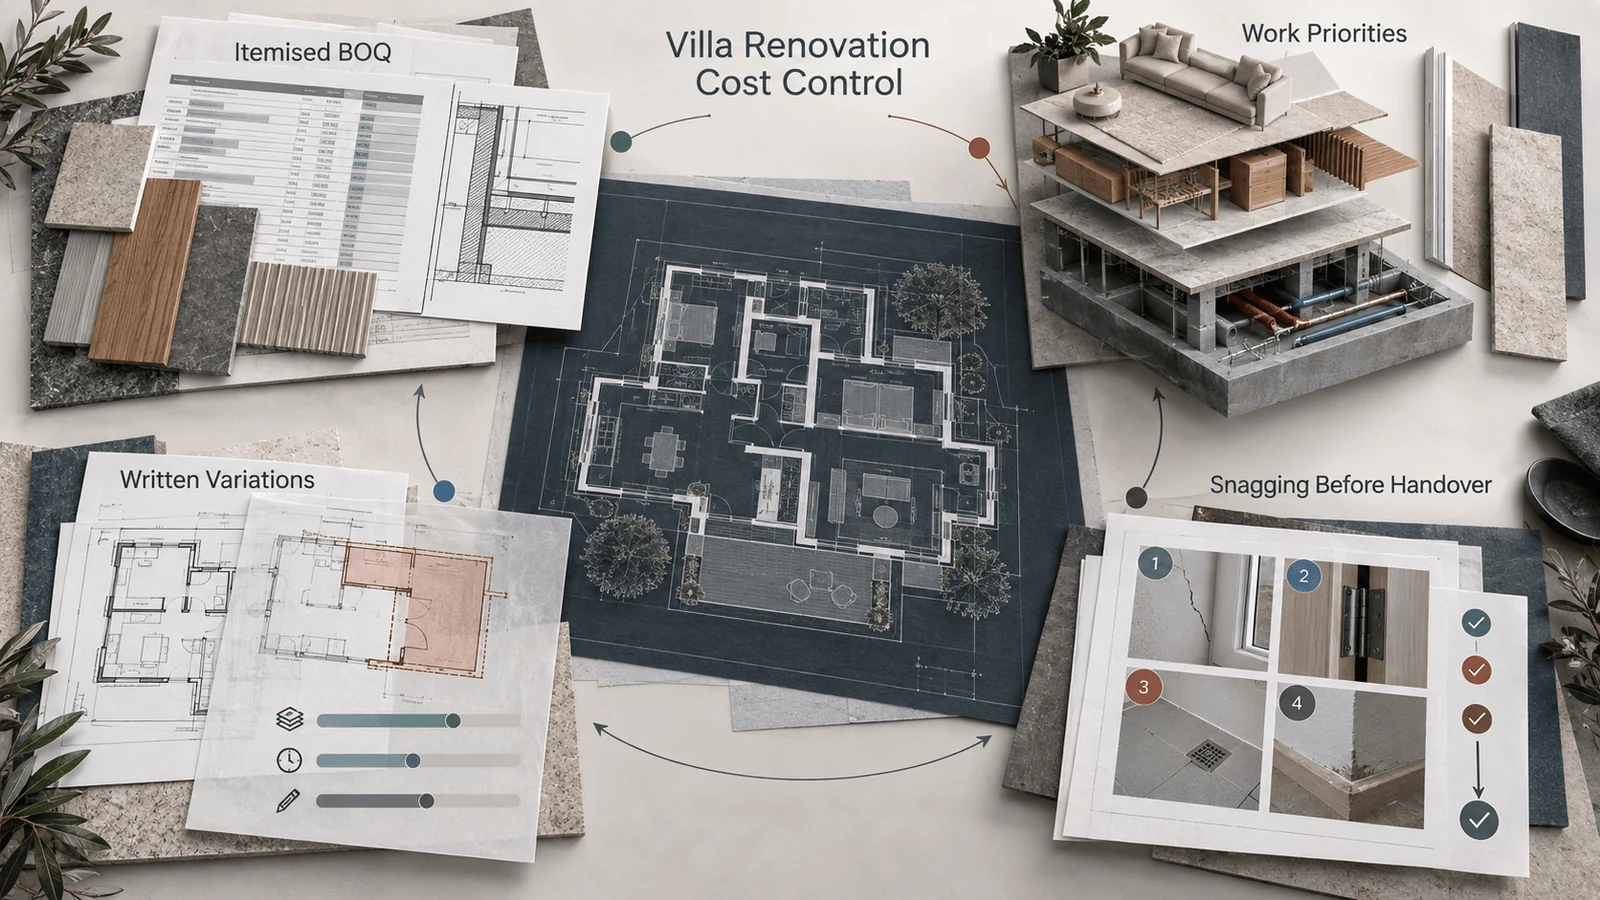
Once the survey and design scope are clear, request an itemised proposal or bill of quantities.
A bill of quantities, often called a BOQ, breaks the work into measurable items. It may show quantities, specifications, unit rates and total amounts for demolition, flooring, ceilings, joinery, electrical work, plumbing and other parts of the renovation.
Your proposal should explain:
- Work included in the price
- Work excluded from the price
- Material quantities
- Product brands or specifications
- Design and consultant fees
- Approval responsibilities and fees
- Procurement charges
- Site and waste-removal costs
- Construction stages
- Payment milestones
- Warranty terms
- Post-handover support
- The process for requesting changes
Compare quotations line by line instead of comparing only the totals. A lower figure may leave out waterproofing, AC changes, approvals, sanitary fixtures, waste removal or final testing.
Put the Budget in the Right Order
Start with work that protects the property and supports daily use:
- Structural, waterproofing and MEP repairs
- Layout and functional improvements
- Flooring, kitchens, bathrooms and fixed joinery
- Furniture, styling and decorative features
A feature wall can wait if the bathroom behind it still has a waterproofing problem. Fixing the hidden issue first may not create an exciting photograph, but it protects the finished work.
Use Cost Figures as Planning Ranges
Euphoria’s current interior renovation service page provides these first-party planning ranges:
| Renovation Scope | Published Planning Range | Published Timeline |
|---|---|---|
| Cosmetic refresh | AED 45,000 to AED 120,000 | 3 to 6 weeks |
| Kitchen and bathroom refit | AED 140,000 to AED 380,000 | 6 to 12 weeks |
| Full villa renovation | Priced after a site survey | 24 to 44 weeks |
These figures help with early planning, but they are not fixed prices for every Dubai villa.
The final cost depends on the size and condition of the property, the amount of MEP work, authority requirements, custom joinery and chosen materials. Two villas with similar floor areas can need very different levels of work.
You can also use the interior design cost estimator to prepare for the first budget discussion, but the site survey and detailed scope should guide the final proposal.
Record Every Change Before Work Continues
A variation order records a change to the agreed scope. It should explain:
- What will change
- Why the change is needed
- Added or removed cost
- Effect on the completion date
- Effect on the approved design
- Who requested it
- Your written approval
Do not rely on verbal approval for a change that affects the price, programme or design. Several small decisions can quietly move a project away from the budget you approved.
Agree on Snagging Before You Sign
The contract should explain how the team will manage three quality stages:
- Pre-snagging carried out by the project team before the villa reaches you
- Formal snagging completed with the owner, consultant or appointed inspector
- Post-snagging carried out after corrections to confirm that the defects are closed
It should also state who prepares the snag list, how long corrections may take, and how the remaining payment connects with handover.
Agreeing on this process early prevents the final inspection from becoming an informal walk-through with no clear responsibility.
Step 5 Know Who Will Handle Every Approval
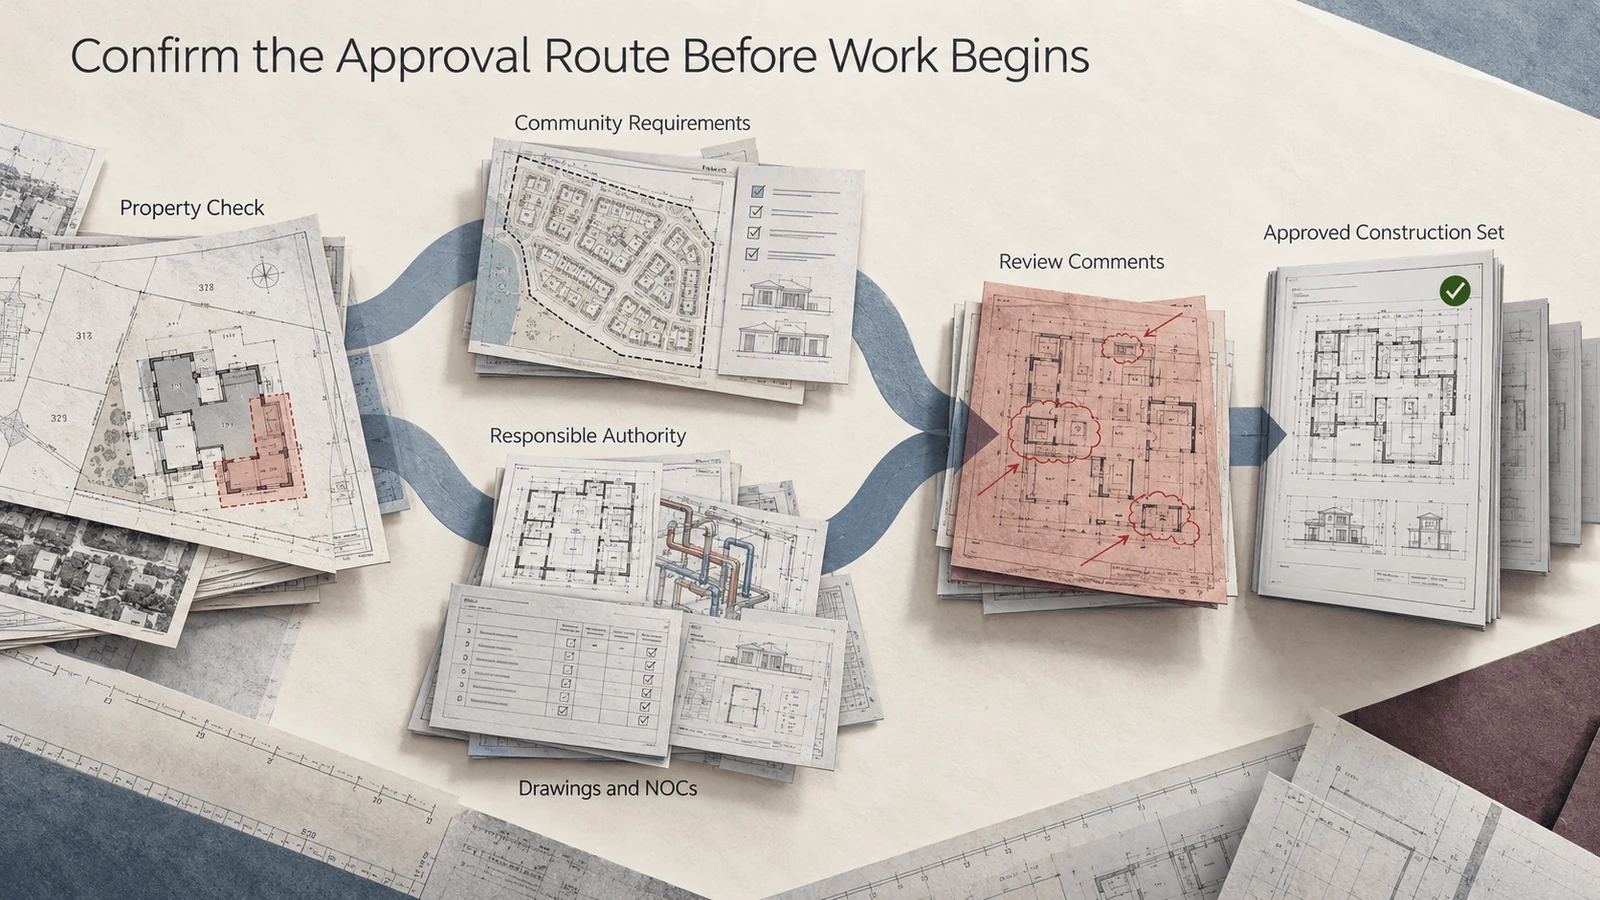
Dubai villas do not follow one approval route. The correct process depends on the property, community, responsible authority and planned changes.
Moving furniture and updating paint may need no building approval, but structural changes, extensions, façade work or major MEP modifications can require drawings, NOCs and permits.
Before work begins, ask for an approval plan that identifies:
- The authority responsible for the property
- The master developer or community requirements
- Each permit or NOC needed
- The drawings and calculations required
- The person responsible for every submission
- The fees included or excluded from the quotation
- Inspections or completion documents required later
The contract should also state who will answer comments and update the drawings if an authority requests changes.
For properties under Dubai Development Authority jurisdiction, the official Building Modification Design service covers the design review process for completed buildings.
Properties under Trakhees jurisdiction may require its official Request Modification Permit. Villas in other areas may follow routes involving Dubai Municipality, DEWA, the master developer or community management.
The appointed consultant should confirm the route for the exact property. A general list cannot replace that check.
Approval comments may also affect the design. If an authority requires a change to a wall, ceiling, façade or service, send the revision back to the design team. They can then adjust the surrounding details and protect the wider design direction.
Once approvals finish, issue one final drawing set for construction. Remove older copies from active use, so the site team does not build from an outdated version.
Step 6 Check That the Materials Match What You Approved
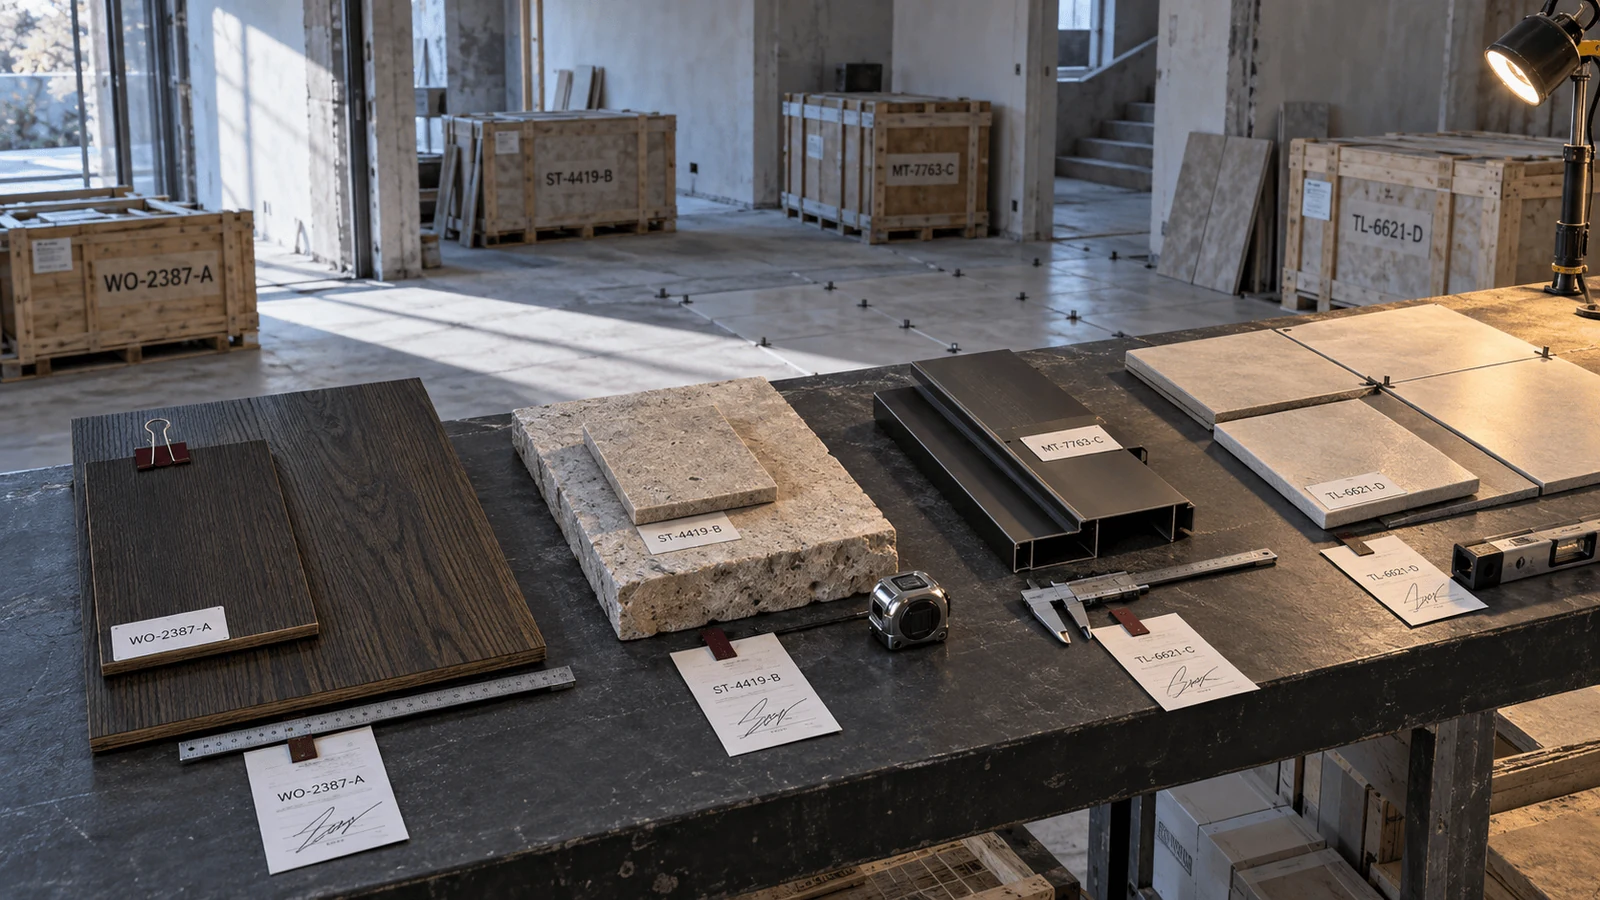
Procurement covers the ordering, tracking, delivery and checking of the products needed for the renovation.
A material can suit the design but still create a problem if the supplier cannot deliver it on time. The wrong batch, finish or size can also affect nearby work.
Before approving an important product, confirm:
- Brand and model
- Colour and finish
- Required quantity
- Current stock
- Delivery date
- Batch consistency
- Installation requirements
- Maintenance needs
- Warranty
- Suitable alternative
Review physical samples for major flooring, stone, wood, paint, fabric and metal finishes. Phone screens and catalogue images can change colours, so check the samples inside the villa when possible.
Natural light and artificial light may also change how finishes appear. A warm wood sample can look balanced during the day but orange under a poorly selected lamp.
Keep signed control samples on site. When materials arrive, the project team can compare the delivery with the approved reference before installation.
If a supplier suggests an alternative, check its colour, texture, size, maintenance needs and compatibility with nearby finishes. You should also see how the change affects the budget and delivery date.
Written approval protects you from discovering an unapproved substitute after the team has installed it across several rooms.
Step 7 Receive Proof Without Managing the Site Yourself
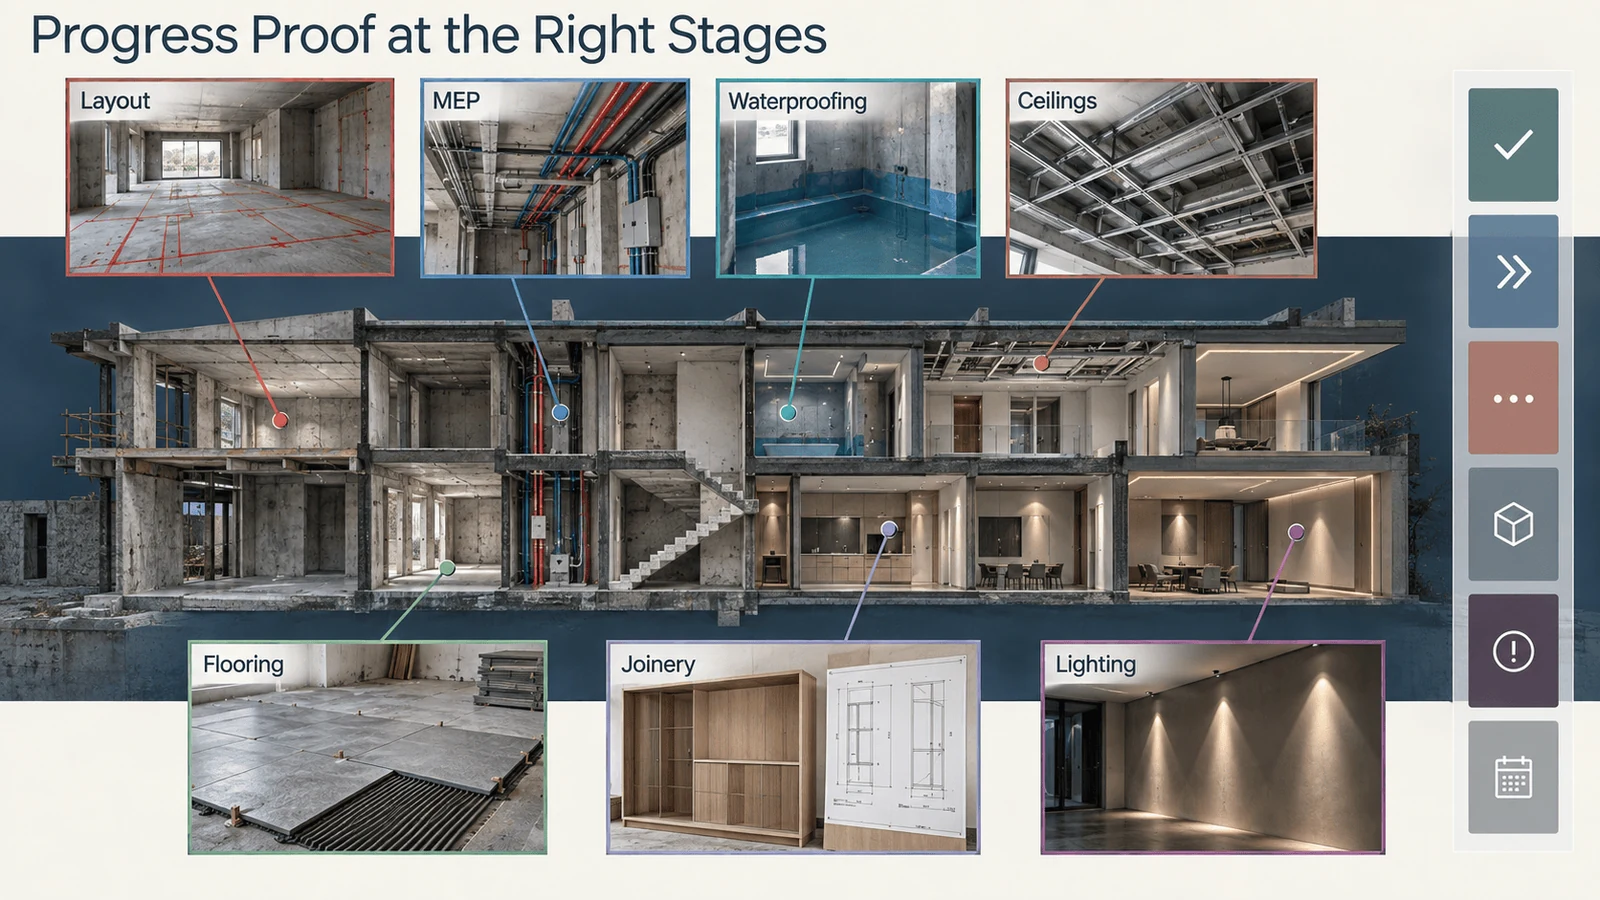
Once construction begins, different trades work on separate parts of the villa. Electricians, plumbers, AC specialists, tilers, painters and joinery installers may all follow the same design, but each team sees only its own work.
One small site decision can therefore create a visible problem elsewhere. Moving an AC grille may affect the ceiling pattern, while shifting an electrical point can interfere with joinery or furniture.
The project needs:
- One approved drawing set
- One clear point of contact
- Approved material samples
- Written substitutions and variations
- Planned design reviews
- Quality checks at agreed stages
- Regular progress updates
Euphoria’s customer journey explains how design, procurement, vendor coordination, execution and quality control connect during a project.
Your progress update should show:
- Work completed during the period
- Photographs from the site
- Work planned next
- Decisions waiting for your approval
- Material delivery status
- Delays or site problems
- Changes affecting cost or handover
Some inspections need to happen before the team covers the work.
Useful checkpoints include:
- After marking the new layout
- Before closing electrical and plumbing work
- After waterproofing tests
- Before closing ceilings
- Before installing large flooring areas
- Before joinery production
- After switching on the lighting
- Before final painting and finishing
These checks allow the team to correct a problem while the work remains accessible.
You should receive enough information to understand what is happening without becoming the messenger between every supplier and contractor.
Step 8 Inspect the Villa Before You Accept It
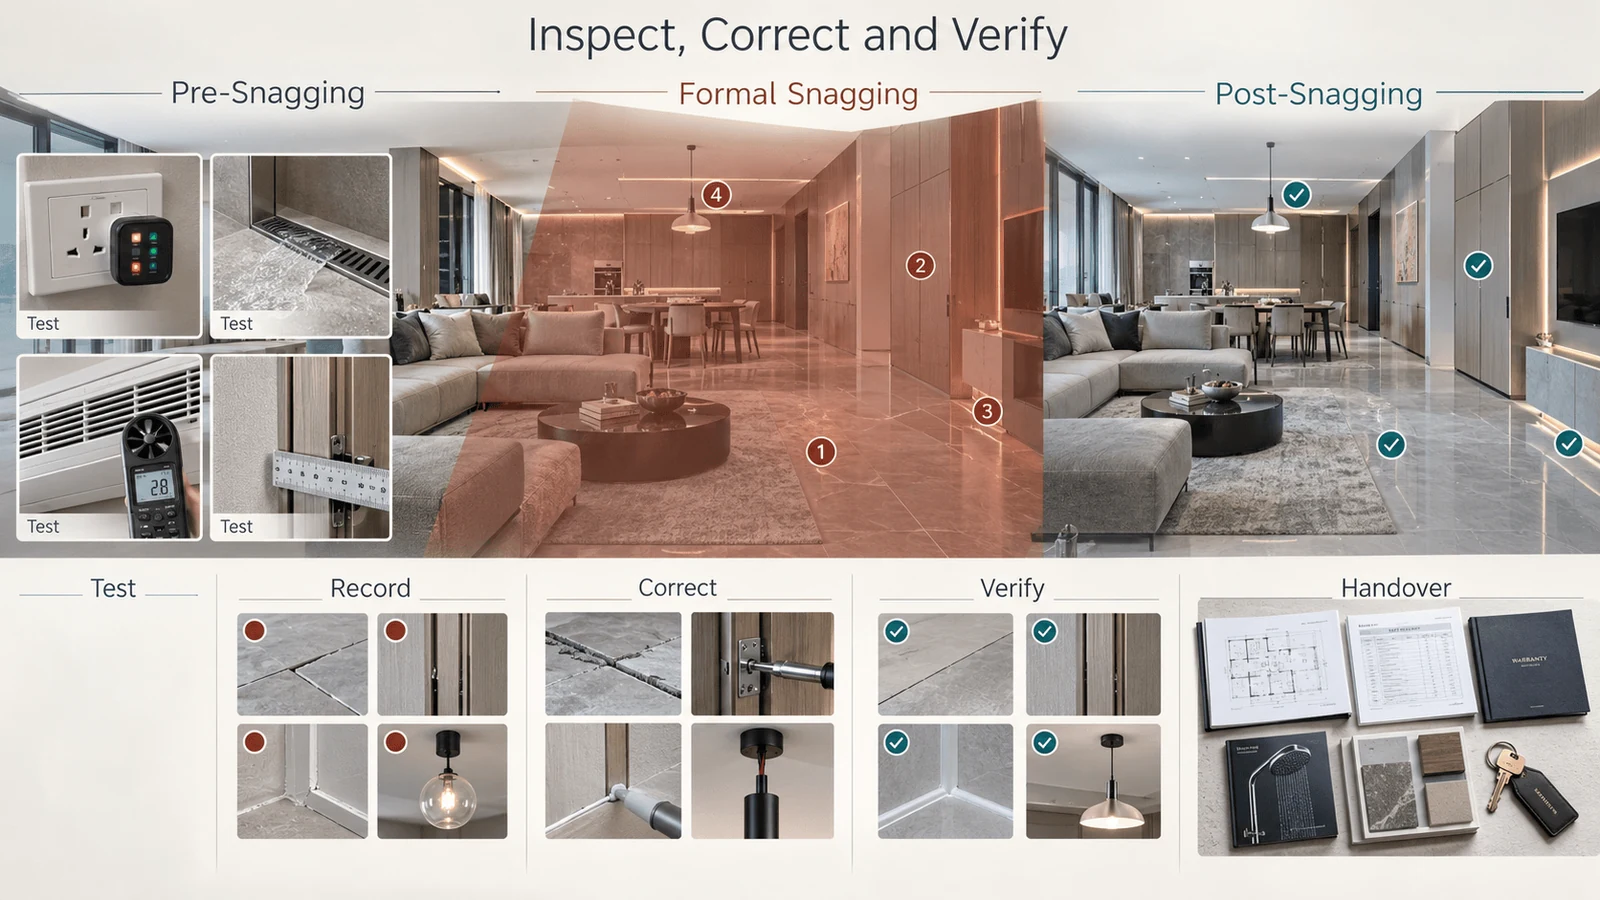
Because the snagging process was agreed before signing, you should reach the end of the project knowing who will inspect the villa and what happens next.
Snagging should cover function, workmanship, design accuracy and handover documents. A quick check for scratches will not find every problem.
Pre-Snagging
The project team should inspect its own work before inviting you for the formal review.
During pre-snagging, it should test the systems, compare installed materials with approved samples, check workmanship and correct clear defects.
This stage may cover:
- Lights, switches and sockets
- Water pressure and drainage
- Air-conditioning
- Doors, locks and hardware
- Drawers and wardrobes
- Kitchen appliances
- Bathroom fixtures
- Flooring and wall finishes
- Paint, sealant and grout
- Installed equipment
Pre-snagging should reduce obvious problems, but it does not replace your formal inspection.
Formal Snagging
During formal snagging, check how the villa works and compare the result with the approved design.
Run taps and showers long enough to check drainage. Open every cabinet, use each switch and test the AC room by room.
Inspect workmanship from the places where you will use the room. A poor joint may disappear when viewed closely but remain visible from the sofa, bed, entrance or dining table.
You should also confirm that:
- Colours match the approved samples
- Wood tones remain consistent
- Metal finishes work together
- Flooring batches look even
- Joinery follows the drawings
- Lighting creates the agreed mood
- Room transitions feel connected
- Personal pieces appear in their planned locations
- No unapproved product has been installed
Check important finishes in daylight and under artificial lighting.
The snag list should give each issue:
- A clear description
- Exact location
- Photograph
- Responsible person
- Correction deadline
- Current status
Post-Snagging
Post-snagging happens after the team says it has completed the corrections.
Return to every item on the snag list and inspect the actual result. Do not close an issue only because its status has changed to “completed.”
Also check that the repair did not damage another finish. Correcting joinery, for example, may leave marks on paint or flooring.
The handover file should contain the applicable:
- Approved drawings
- Test and commissioning records
- Product warranties
- Equipment manuals
- Paint and material references
- Maintenance guidance
- Keys and access details
- Post-handover support terms
- Record of any agreed outstanding work
Complete the payment and handover process according to the contract after the agreed snagging checks and closeout requirements have been met.
Villa Renovation Checklist for Dubai Homeowners
Before work begins, confirm that you have:
- Written down how the villa should feel and function
- Listed the existing pieces you want to keep
- Completed a physical site survey
- Recorded the existing condition with photographs
- Separated retained, repaired and replaced items
- Approved one design direction
- Received coordinated technical drawings
- Checked the itemised scope and exclusions
- Prioritised necessary work in the budget
- Confirmed the approval route and responsible parties
- Approved physical material samples
- Agreed on the substitution and variation process
- Set payment and construction milestones
- Scheduled inspections before concealed work closes
- Agreed on pre-snagging, formal snagging and post-snagging
- Requested warranties and handover documents
Keep Control Without Managing Every Detail Yourself
Learning how to renovate a villa in Dubai begins with understanding the property before choosing finishes or accepting a total price.
Once the survey, brief and design direction are clear, the team can prepare a more dependable scope. Written approvals, verified materials and stage inspections then help keep the renovation close to the budget and design you accepted.
A good Dubai villa remodelling and interior process should also tell you what will happen when something changes. That includes who will update the design, how the cost will be approved, and how the team will close defects before handover.
If you are preparing for a complete refurbishment or a focused update, you can speak with the Euphoria design team about your villa, priorities and intended timeline.
Bring any existing drawings, photographs and early ideas to the first discussion. They can help the team identify which questions the site survey needs to answer.